Friday, May 17, 2019


After log time posting new topic. This time I would like to share knowledge about web Recording in JMETER using Badboy software. Actully you can record without using Badboy but still I would like to share recording with Badboy,

So first you need to have JMETER installed on your machine and Badboy Installed on your machine
You can download Badboy software from http://www.badboy.com.au/ by filling some basic user information.

Istallation of Badboy software is also simple so not sharing this step just do Next next it will install.

Double Click on Badboy icon and open Badboy software


Enter URL and Click run button 


Wikipedia page opened . Search for India 


GO to Menu --> File--> Export to JMETER --> save 


Open project in JMETER and run 


Friday, January 25, 2019


Jenkins Overview
Jenkins is an powerful open source automation server. It is platform independent . You can combine with any tool unparalleled plugin ecosystem to support practically every tool as part of your delivery pipelines. It is widely used for continuous integration & continuous delivery 


Jenkins History
Jenkins was originally developed as the Hudson project. Hudson's creation started in summer of 2004 at Sun Microsystems. It was first released in Feb 2005. In 2011, creator Kohsuke Kawaguchi received an O'Reilly Open Source Award for his work on the Hudson/Jenkins project. Jenkins replaced Hudson since February 8, 2017 in Eclipse

 How Jenkins Works 

Wednesday, January 16, 2019


Step by step Jenkins Tutorial for Testers


In this course you will learn about Jenkins. Famoust CI tool.


Jenkins - Tutorial course content


  1. Jenkins - Overview
  2. Jenkins - Installation
  3. Jenkins - Configuration
  4. Jenkins - Management
  5. Jenkins - Setup Build Jobs
  6. Jenkins - Unit Testing
  7. Jenkins - Automated Testing
  8. Jenkins - Notification
  9. Jenkins - Reporting
  10. Jenkins - Metrics and Trends
  11. Jenkins - Managing Plugins
  12. Jenkins - Security
  13. Jenkins - Plugin


Friday, January 11, 2019


I was facing this issue when I was trying to run JMETER from CMD/ Command prompt / Non Gui, Even JMETER was working fine in GUI mode.

To run I started JMETER in Bin path of JMETER and ran below query

C:\tools\apache-jmeter-5.0\bin>


jmeter -n -t "C:\Users\incvelh\Desktop\JMETER\HTTP Request.jmx"

it was giving me error

JMETER is not a recognized file as an internal or external command, operable or external command

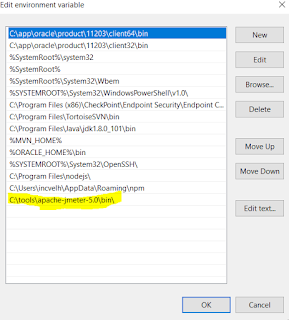
to solve this I set system environment variable and it worked for me

to set environment variable for JMETER in system variable follow below path


Computer -> Advanced System settings -> Environment Variables -> Ok -> System Variables -> Path

now try to run JMTER in CMD 


Wednesday, January 9, 2019

 To parse JSON response we need to use JSON Extractor and Bean Shell Post Process (Here we need some do coding) Add JSON Extractor & Bean Shell post processor to thread group Right click on Thread Group> Add>Post Processor
JSON Extractor & Bean Shell post processor added to thread group 


We are capturing “geoAddressId” and will save it in CSV 


How to Configuring JSON Extractor to Parse JSON Response in JMETER For API  performance Testing


 Variable Name:- You can set any variable name to which Extracted geoAddressId value to be assigned and stored in memory 


JSON Path Expression:-  It allows you to enter search criteria to search Parameter ( you can google Regular Expression for more details ) 

Match No:- 

Default Value- If geoAddressId not found then it will save default value “No geoAddressId found” 


Now we want to save value stored in memory to CSV file, for this we need to write Bean shell Script in Bean shell Post Processor. Open bean shell Post processor. And write below script

import java.io.FileOutputStream; 
import java.util.Map; 
import java.util.Set; 
import java.io.FileWriter; 
String str=vars.get("geoAddressId"); 
FileWriter writer = new FileWriter("D:\\Performance\\Test1\\Test Data sheets\\ADDRESS BS\\geoaddressid.csv",true);  
writer.write(str); 
writer.write("\t"); 
writer.write(System.getProperty("line.separator")); 
writer.close(); 


Now run performance test with 5 users, and check Response as well as geoAddressId stored in CSV 

All 5 users got success


Also in Data sheet all 5 geoAddressId are saved


Monday, January 7, 2019

How to pass variable data in JMETER request

How to use CSV data set config in Jmeter for passing varible data in JSON request 

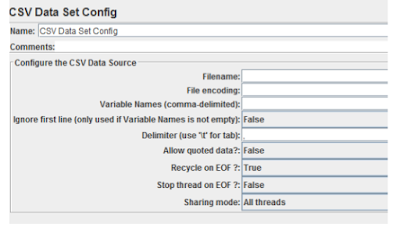
To create real-time scenario we need to pass variable data in request. For this we can use “CSV data set config”. Right click on Thread group > Add> Config Element> CSV Data Set Config


You will see CSV data set config like this 


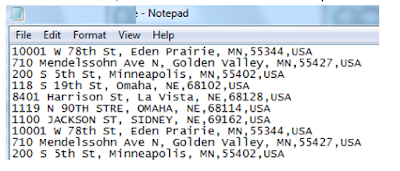
Now we need to create a CSV from which JMETER variable will pick up value and append in Request.  Create CSV and enter data for variable, Here I am passing address line as variable. ( You can open CSV in notepad ). After each address press TAB and then next line new address  , So JMETER can understand multiple variables 


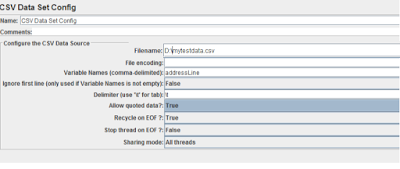
Update configuration  in “CSV data config set”


Filename:- Complete path where file is stored 
Variable Name:- You can give any name to variable 
Ignore First line:- If you specified Name of variable in data sheet at first line then Make it True else False ( I made false) 
Delimiter: -  We used TAB so will use \t for tab 
Allow Quoted data:- If test data is in quotes then make it true JEMTER will omit quotes and will use data inside quotes (Recommended to keep True always) 
Recycle on EOF: - True, It will recycle used data once reaches to end of file 
Stop Thread on EOF:- False , as we want to recycle data 
Sharing mode: - All threads  

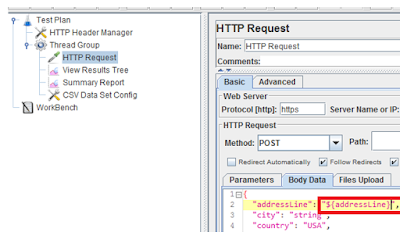
Once CSV data set configuration done we need to replace actual address line with variable name ${addressLine} 


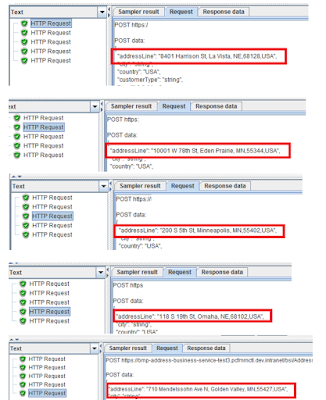
Now run test for 5 users, and check result all 5 users sent different address line in request  


Thursday, December 27, 2018

 API performance testing using JMETER


In this article we are going to learn about How to use step by step JMETER for API Load and Performance testing . Basic information and details about JMETER and what is web service and API had been provided in our earlier topics.  JMETER is open source tool. Downloading JMETER is already covered in earlier topic. JMETER is free.


For question How to do API performance testing using JMETER? below are the steps.

Step 1.  Configure Test Plan in JMETER

For REST API performance testing we have to start with Test plan in JMETER. The test Plan is where the overall settings for a test are specified. Static variables can be defined for values that are repeated throughout a test, such as server names. For example the variable “environment” could be defined as www.example.com, and the rest of the test plan could refer to it as ${environment}. This simplifies changing the name later


Step2. Adding HTTP Header manager to JMETER
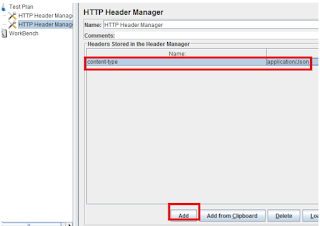
  1.     Right click on test plan >Add> Config element> http header manager
  2.     Click on Add button to add header 

There are multiple headers are available you can use any as per your requirement

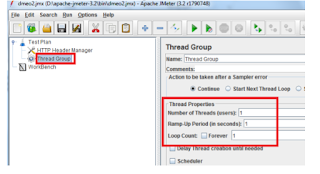
Step3. Adding Thread group to JMETER
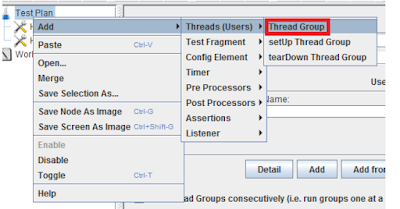
 Right click on Test Plan> Click Add> Click Threads>Thread group


You can see thread group is added in project.
A Thread Group defines a pool of users that will execute a particular test case against your server.
Number of Threads-Number of users to simulate
Ramp-up Period-How long JMeter should take to get a
Loop Count-Number of times to perform the test case.


Step4. Adding HTTP Requests
 1.Right click on thread group> Samplers> HTTP Request 


2. HTTP Request added to project. This sampler lets you send an HTTP/HTTPS request to a web server.
3. Use Protocol- HTTPS, Server name- Endpoint URL of API, Method , Enter REST request in BODY DATA tab and Save

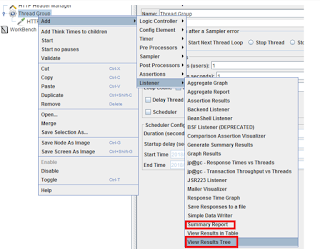
Step 5-5. Adding Listener’s 

Most of the listeners perform several roles in addition to "listening" to the test results. They also provide means to view, save, and read saved test results. We are using two listeners  “Summary Report” and “View result Tree”. Right click on Thread group> Add> listeners 


 “Summary Report” and “View result tree” both listeners are added to project  

6. Running Test 

a.  Click on test plan and update 
  Number of Threads (5)
  Ramp-up Period(0)
  Loop Count(1) 
And click on run button  

b. Once you start execution you can see Number of users Test run, Time in upper right corner. Once execution done Green flag turn down to Grey 

7. Understanding  JMETER performance testing Reports 

A- How to understand JMETER Summary Report 


 Label - The name of the sample.  
 # Samples - The number of samples with the same label 
 Average - The average elapsed time of a set of results
  Min - The lowest elapsed time for the samples with the same label 
Max - The longest elapsed time for the samples with the same label 
Std. Dev. - the Standard Deviation of the sample elapsed time 
Error % - Percent of requests with errors 
Throughput - the Throughput is measured in requests per second/minute/hour. The time unit is chosen so that the displayed rate is at least 1.0. When the throughput is saved to a CSV file, it is expressed in requests/second, i.e. 30.0 requests/minute is saved as 0.5. 
Received KB/sec - The throughput measured in Kilobytes per second 
Sent KB/sec - The throughput measured in Kilobytes per second
  Avg. Bytes - average size of the sample response in bytes 

b.  Understanding JMTER View Result Tree Report –  
Sampler Result Tab-  Here you can see 5 HTTP Request in Green as we done Performance test with 5 users and all were  succeeded. If any one or more failed it will show in Read. Here you can  header data passed for each user


Request Tab- You can see here Request sent for each user

Response Data Tab- You can see here response received for each user 


Thursday, December 20, 2018


Understanding Listeners in JEMTER  :-  Listener displays particulars of sampler requests and responses, and can display basic HTML and XML representations of the response. Other listeners deliver summary or aggregation information. We can use listeners can direct the data to a file for later use. Listeners can be added anywhere in the test, including directly under the test plan

Types of JMETER Listeners 

1.                Aggregate Graph
The Aggregate Graph listener is used to show the test results in both tabular form(reports) and graphs.
2.                Aggregate Report
The Aggregate Report listener is used to display and store test results in the form of reports.
3.                Assertion Results
The assertion results listener is used to display the assertion result for each erroneous sampler response. It is advised to not use this listener during performance test as it is very resource intensive. It should be used while debugging and functional testing only.
4.                Backend Listener
The backend listener is a special type of asynchronous listener used specifically with BackendListenerClient for its customization.
5.                BeanShell Listener
The beanshell listener is used to enable beanshell scripting in JMeter. For details on BeanShell Scipting check our tutorial Bean Shell Scripting in JMeter.
6.                BSF Listener
The beanshell listener is used to enable BSF scripting in JMeter.
7.                Comparison Assertion Visualizer
The Comparison Assertion Visualizer is used to provide the comparison between assertion result in an easy to compare UI.
8.                Generate Summary Results
The Generate Summary results listener is used to store and display detailed test results to log files.
9.                Graph Results
The Graph results listener is used to display each sampler resuest's response time graph in terms of average, median, deviation and throughput.
10.             JSR223 Listener
The JSR223 Listener is used to enable JSR223 scripting in JMeter.
11.             Mailer Visualizer
The Mailer Visualizer sampler is used to provide the functionality of sending customized mails in case of some specific error threshold.
12.             Monitor Results
This is a newly added listener in JMeter used to display and store server performance stats.
13.             Response Time Graph
The response time graph is used to provide the graphical representation of response time with time elapsed during the test run.
14.             Save Response to a file
The save response to a file listener is used to store the sampler response in a file. This listener is used while functional testing or debugging the test script.
15.             Simple Data Writer
The simple data writer listener is used to save the sampler response to a file after with different configurations to remove several unnecessary overheads.
16.             Summary Report
The summary report is used to store and display the test result in tabular form just like aggregate report listener but consumes less memory(as per Apache JMeter).
17.             View Results Tree
This listener is used to provide and store test results for each and every individual sampler.
18.             View Results in Table
The view results in table listener is used to display the sampler response header and response body.


Tuesday, December 11, 2018


In this part of step by step JMETER tutorial we are going to learn about JMETER element “THREAD GROUP”

What is Thread Group in JMETER:-

Thread group is a place where we actually put number of users (Threads). It is starting point of JMETER test plan. This is first element of JMETER test plan. Each thread represent one user.  Using this Thread Group you can set number of users. Using thread group is basic step to start with JMETER load testing.

Now let’s understand How Element Thread group works .
If you put load of 50 users on your server by configuring 50 threads . Then all 50 user will simulate and will put load on server.


There are 3 controls we need to set for JMETER
  • Set the number of threads
  • Set the ramp-up period
  • Set the number of times to execute the test

  • How to set the number of threads
Here we need to set number of threads . If you put load of 50 users on your server by configuring 50 threads . Then all 50 user will simulate and will put load on server.
  • How to set the ramp-up period
The ramp-up period expresses JMeter how long to take to "ramp-up" to the full number of threads selected. If 10 threads are used, and the ramp-up period is 100 seconds, then JMeter will take 100 seconds to get all 10 threads up and running
  • How to set the number of times to execute the test (LOOP count):- how many times to run thread group  in loop. If you set value 2 then thread group will run twice.

Saturday, October 13, 2018


Creating Test Plan in JMETER

How to create test plan in JMETER for REST API performance testing?

For REST API performance testing we have to start with Test plan in JMETER. The test Plan is where the overall settings for a test are specified. Static variables can be defined for values that are repeated throughout a test, such as server names. For example the variable “environment” could be defined as www.example.com, and the rest of the test plan could refer to it as ${environment}. This simplifies changing the name later


Monday, August 13, 2018

HTML - Lists

HTML offers web authors three ways for specifying lists of information. All lists must contain one or more list elements. 

Lists may contain −

<ul> − An unordered list. This will list items using plain bullets.

<ol> − An ordered list. This will use different schemes of numbers to list your items.

<dl> − A definition list. This arranges your items in the same way as they are arranged in a dictionary.

HTML Unordered Lists

An unordered list is a collection of related items that have no special order or sequence. This list is created by using HTML <ul> tag. Each item in the list is marked with a bullet.

Example

<!DOCTYPE html>
<html>

   <head>
      <title>HTML Unordered List</title>
   </head>
   <body>
      <ul>
         <li>Beetroot</li>
         <li>Ginger</li>
         <li>Potato</li>
         <li>Radish</li>
      </ul>
   </body>
   
</html>
This will produce the following result −


The type Attribute

You can use type attribute for <ul> tag to specify the type of bullet you like. By default, it is a disc. Following are the possible options −

<ul type = "square">
<ul type = "disc">
<ul type = "circle">

Example

Following is an example where we used <ul type = "square">

<!DOCTYPE html>
<html>

   <head>
      <title>HTML Unordered List</title>
   </head>

   <body>
      <ul type = "square">
         <li>Beetroot</li>
         <li>Ginger</li>
         <li>Potato</li>
         <li>Radish</li>
      </ul>
   </body>

</html>
This will produce the following result −


Example

Following is an example where we used <ul type = "disc">

<!DOCTYPE html>
<html>

   <head>
      <title>HTML Unordered List</title>
   </head>
   <body>
      <ul type = "disc">
         <li>Beetroot</li>
         <li>Ginger</li>
         <li>Potato</li>
         <li>Radish</li>
      </ul>
   </body>

</html>
This will produce the following result −


Example

Following is an example where we used <ul type = "circle"> −

 <!DOCTYPE html>
<html>

   <head>
      <title>HTML Unordered List</title>
   </head>

   <body>
      <ul type = "circle">
         <li>Beetroot</li>
         <li>Ginger</li>
         <li>Potato</li>
         <li>Radish</li>
      </ul>
   </body>
</html>
This will produce the following result −


HTML Ordered Lists

If you are required to put your items in a numbered list instead of bulleted, then HTML ordered list will be used. This list is created by using <ol> tag. The numbering starts at one and is incremented by one for each successive ordered list element tagged with <li>.

Example

<!DOCTYPE html>
<html>

   <head>
      <title>HTML Ordered List</title>
   </head>

   <body>
      <ol>
         <li>Beetroot</li>
         <li>Ginger</li>
         <li>Potato</li>
         <li>Radish</li>
      </ol>
   </body>

</html>
This will produce the following result −


The type Attribute

You can use type attribute for <ol> tag to specify the type of numbering you like. By default, it is a number. Following are the possible options −

<ol type = "1"> - Default-Case Numerals.
<ol type = "I"> - Upper-Case Numerals.
<ol type = "i"> - Lower-Case Numerals.
<ol type = "A"> - Upper-Case Letters.
<ol type = "a"> - Lower-Case Letters.

Example

Following is an example where we used <ol type = "1">

 <!DOCTYPE html>
<html>

   <head>
      <title>HTML Ordered List</title>
   </head>

   <body>
      <ol type = "1">
         <li>Beetroot</li>
         <li>Ginger</li>
         <li>Potato</li>
         <li>Radish</li>
      </ol>
   </body>

</html>
This will produce the following result −

Example

Following is an example where we used <ol type = "I">

<!DOCTYPE html>
<html>

   <head>
      <title>HTML Ordered List</title>
   </head>
   <body>
      <ol type = "I">
         <li>Beetroot</li>
         <li>Ginger</li>
         <li>Potato</li>
         <li>Radish</li>
      </ol>
   </body>
</html>
This will produce the following result −


Example

Following is an example where we used <ol type = "i">

 <!DOCTYPE html>
<html>
   
   <head>
      <title>HTML Ordered List</title>
   </head>
   <body>
      <ol type = "i">
         <li>Beetroot</li>
         <li>Ginger</li>
         <li>Potato</li>
         <li>Radish</li>
      </ol>
   </body>
</html>
This will produce the following result −


Example

Following is an example where we used <ol type = "A" >

 <!DOCTYPE html>
<html>

   <head>
      <title>HTML Ordered List</title>
   </head>
   <body>
      <ol type = "A">
         <li>Beetroot</li>
         <li>Ginger</li>
         <li>Potato</li>
         <li>Radish</li>
      </ol>
   </body>
</html>
This will produce the following result −


Example

Following is an example where we used <ol type = "a">

 <!DOCTYPE html>
<html>
   
   <head>
      <title>HTML Ordered List</title>
   </head>
   <body>
      <ol type = "a">
         <li>Beetroot</li>
         <li>Ginger</li>
         <li>Potato</li>
         <li>Radish</li>
      </ol>
   </body>
</html>
This will produce the following result −


The start Attribute

You can use start attribute for <ol> tag to specify the starting point of numbering you need. Following are the possible options −

<ol type = "1" start = "4">    - Numerals starts with 4.
<ol type = "I" start = "4">    - Numerals starts with IV.
<ol type = "i" start = "4">    - Numerals starts with iv.
<ol type = "a" start = "4">    - Letters starts with d.
<ol type = "A" start = "4">    - Letters starts with D.

Example

Following is an example where we used <ol type = "i" start = "4" >

<!DOCTYPE html>
<html>

   <head>
      <title>HTML Ordered List</title>
   </head>
   <body>
      <ol type = "i" start = "4">
         <li>Beetroot</li>
         <li>Ginger</li>
         <li>Potato</li>
         <li>Radish</li>
      </ol>
   </body>
</html>
This will produce the following result −


HTML Definition Lists

HTML and XHTML supports a list style which is called definition lists where entries are listed like in a dictionary or encyclopedia. The definition list is the ideal way to present a glossary, list of terms, or other name/value list.

Definition List makes use of following three tags.

<dl> − Defines the start of the list
<dt> − A term
<dd> − Term definition
</dl> − Defines the end of the list

Example

<!DOCTYPE html>
<html>

   <head>
      <title>HTML Definition List</title>
   </head>
   <body>
      <dl>
         <dt><b>HTML</b></dt>
         <dd>This stands for Hyper Text Markup Language</dd>
         <dt><b>HTTP</b></dt>
         <dd>This stands for Hyper Text Transfer Protocol</dd>
      </dl>
   </body>
</html>
This will produce the following result −

Popular Posts