Monday, August 13, 2018

HTML - Lists

HTML offers web authors three ways for specifying lists of information. All lists must contain one or more list elements. 

Lists may contain −

<ul> − An unordered list. This will list items using plain bullets.

<ol> − An ordered list. This will use different schemes of numbers to list your items.

<dl> − A definition list. This arranges your items in the same way as they are arranged in a dictionary.

HTML Unordered Lists

An unordered list is a collection of related items that have no special order or sequence. This list is created by using HTML <ul> tag. Each item in the list is marked with a bullet.

Example

<!DOCTYPE html>
<html>

   <head>
      <title>HTML Unordered List</title>
   </head>
   <body>
      <ul>
         <li>Beetroot</li>
         <li>Ginger</li>
         <li>Potato</li>
         <li>Radish</li>
      </ul>
   </body>
   
</html>
This will produce the following result −


The type Attribute

You can use type attribute for <ul> tag to specify the type of bullet you like. By default, it is a disc. Following are the possible options −

<ul type = "square">
<ul type = "disc">
<ul type = "circle">

Example

Following is an example where we used <ul type = "square">

<!DOCTYPE html>
<html>

   <head>
      <title>HTML Unordered List</title>
   </head>

   <body>
      <ul type = "square">
         <li>Beetroot</li>
         <li>Ginger</li>
         <li>Potato</li>
         <li>Radish</li>
      </ul>
   </body>

</html>
This will produce the following result −


Example

Following is an example where we used <ul type = "disc">

<!DOCTYPE html>
<html>

   <head>
      <title>HTML Unordered List</title>
   </head>
   <body>
      <ul type = "disc">
         <li>Beetroot</li>
         <li>Ginger</li>
         <li>Potato</li>
         <li>Radish</li>
      </ul>
   </body>

</html>
This will produce the following result −


Example

Following is an example where we used <ul type = "circle"> −

 <!DOCTYPE html>
<html>

   <head>
      <title>HTML Unordered List</title>
   </head>

   <body>
      <ul type = "circle">
         <li>Beetroot</li>
         <li>Ginger</li>
         <li>Potato</li>
         <li>Radish</li>
      </ul>
   </body>
</html>
This will produce the following result −


HTML Ordered Lists

If you are required to put your items in a numbered list instead of bulleted, then HTML ordered list will be used. This list is created by using <ol> tag. The numbering starts at one and is incremented by one for each successive ordered list element tagged with <li>.

Example

<!DOCTYPE html>
<html>

   <head>
      <title>HTML Ordered List</title>
   </head>

   <body>
      <ol>
         <li>Beetroot</li>
         <li>Ginger</li>
         <li>Potato</li>
         <li>Radish</li>
      </ol>
   </body>

</html>
This will produce the following result −


The type Attribute

You can use type attribute for <ol> tag to specify the type of numbering you like. By default, it is a number. Following are the possible options −

<ol type = "1"> - Default-Case Numerals.
<ol type = "I"> - Upper-Case Numerals.
<ol type = "i"> - Lower-Case Numerals.
<ol type = "A"> - Upper-Case Letters.
<ol type = "a"> - Lower-Case Letters.

Example

Following is an example where we used <ol type = "1">

 <!DOCTYPE html>
<html>

   <head>
      <title>HTML Ordered List</title>
   </head>

   <body>
      <ol type = "1">
         <li>Beetroot</li>
         <li>Ginger</li>
         <li>Potato</li>
         <li>Radish</li>
      </ol>
   </body>

</html>
This will produce the following result −

Example

Following is an example where we used <ol type = "I">

<!DOCTYPE html>
<html>

   <head>
      <title>HTML Ordered List</title>
   </head>
   <body>
      <ol type = "I">
         <li>Beetroot</li>
         <li>Ginger</li>
         <li>Potato</li>
         <li>Radish</li>
      </ol>
   </body>
</html>
This will produce the following result −


Example

Following is an example where we used <ol type = "i">

 <!DOCTYPE html>
<html>
   
   <head>
      <title>HTML Ordered List</title>
   </head>
   <body>
      <ol type = "i">
         <li>Beetroot</li>
         <li>Ginger</li>
         <li>Potato</li>
         <li>Radish</li>
      </ol>
   </body>
</html>
This will produce the following result −


Example

Following is an example where we used <ol type = "A" >

 <!DOCTYPE html>
<html>

   <head>
      <title>HTML Ordered List</title>
   </head>
   <body>
      <ol type = "A">
         <li>Beetroot</li>
         <li>Ginger</li>
         <li>Potato</li>
         <li>Radish</li>
      </ol>
   </body>
</html>
This will produce the following result −


Example

Following is an example where we used <ol type = "a">

 <!DOCTYPE html>
<html>
   
   <head>
      <title>HTML Ordered List</title>
   </head>
   <body>
      <ol type = "a">
         <li>Beetroot</li>
         <li>Ginger</li>
         <li>Potato</li>
         <li>Radish</li>
      </ol>
   </body>
</html>
This will produce the following result −


The start Attribute

You can use start attribute for <ol> tag to specify the starting point of numbering you need. Following are the possible options −

<ol type = "1" start = "4">    - Numerals starts with 4.
<ol type = "I" start = "4">    - Numerals starts with IV.
<ol type = "i" start = "4">    - Numerals starts with iv.
<ol type = "a" start = "4">    - Letters starts with d.
<ol type = "A" start = "4">    - Letters starts with D.

Example

Following is an example where we used <ol type = "i" start = "4" >

<!DOCTYPE html>
<html>

   <head>
      <title>HTML Ordered List</title>
   </head>
   <body>
      <ol type = "i" start = "4">
         <li>Beetroot</li>
         <li>Ginger</li>
         <li>Potato</li>
         <li>Radish</li>
      </ol>
   </body>
</html>
This will produce the following result −


HTML Definition Lists

HTML and XHTML supports a list style which is called definition lists where entries are listed like in a dictionary or encyclopedia. The definition list is the ideal way to present a glossary, list of terms, or other name/value list.

Definition List makes use of following three tags.

<dl> − Defines the start of the list
<dt> − A term
<dd> − Term definition
</dl> − Defines the end of the list

Example

<!DOCTYPE html>
<html>

   <head>
      <title>HTML Definition List</title>
   </head>
   <body>
      <dl>
         <dt><b>HTML</b></dt>
         <dd>This stands for Hyper Text Markup Language</dd>
         <dt><b>HTTP</b></dt>
         <dd>This stands for Hyper Text Transfer Protocol</dd>
      </dl>
   </body>
</html>
This will produce the following result −

Friday, August 10, 2018

HTML - Tables


The HTML tables allow web authors to arrange data like text, images, links, other tables, etc. into rows and columns of cells.

The HTML tables are created using the <table> tag in which the <tr> tag is used to create table rows and <td> tag is used to create data cells. The elements under <td> are regular and left aligned by default

Example

<!DOCTYPE html>
<html>

   <head>
      <title>HTML Tables</title>
   </head>
   <body>
      <table border = "1">
         <tr>
            <td>Row 1, Column 1</td>
            <td>Row 1, Column 2</td>
         </tr>
         
         <tr>
            <td>Row 2, Column 1</td>
            <td>Row 2, Column 2</td>
         </tr>
      </table>
      
   </body>
</html>
This will produce the following result −


Here, the border is an attribute of <table> tag and it is used to put a border across all the cells. If you do not need a border, then you can use border = "0".

Table Heading

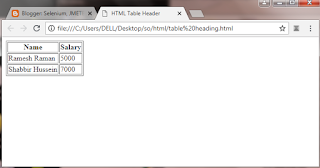
Table heading can be defined using <th> tag. This tag will be put to replace <td> tag, which is used to represent actual data cell. Normally you will put your top row as table heading as shown below, otherwise you can use <th> element in any row. Headings, which are defined in <th> tag are centered and bold by default.

Example

<!DOCTYPE html>
<html>

   <head>
      <title>HTML Table Header</title>
   </head>
   <body>
      <table border = "1">
         <tr>
            <th>Name</th>
            <th>Salary</th>
         </tr>
         <tr>
            <td>Ramesh Raman</td>
            <td>5000</td>
         </tr>
         
         <tr>
            <td>Shabbir Hussein</td>
            <td>7000</td>
         </tr>
      </table>
   </body>
   
</html>

This will produce the following result −


Cellpadding and Cellspacing Attributes

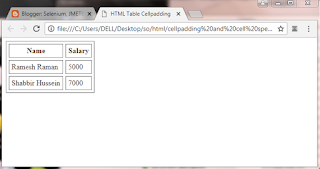
There are two attributes called cellpadding and cellspacing which you will use to adjust the white space in your table cells. The cellspacing attribute defines space between table cells, while cellpadding represents the distance between cell borders and the content within a cell.

Example

<!DOCTYPE html>
<html>

   <head>
      <title>HTML Table Cellpadding</title>
   </head>
   <body>
      <table border = "1" cellpadding = "5" cellspacing = "5">
         <tr>
            <th>Name</th>
            <th>Salary</th>
         </tr>
         <tr>
            <td>Ramesh Raman</td>
            <td>5000</td>
         </tr>
         <tr>
            <td>Shabbir Hussein</td>
            <td>7000</td>
         </tr>
      </table>
   </body>
</html>
This will produce the following result −

Colspan and Rowspan Attributes

You will use colspan attribute if you want to merge two or more columns into a single column. Similar way you will use rowspan if you want to merge two or more rows.


Example

<!DOCTYPE html>
<html>

   <head>
      <title>HTML Table Colspan/Rowspan</title>
   </head>
   <body>
      <table border = "1">
         <tr>
            <th>Column 1</th>
            <th>Column 2</th>
            <th>Column 3</th>
         </tr>
         <tr>
            <td rowspan = "2">Row 1 Cell 1</td>
            <td>Row 1 Cell 2</td>
            <td>Row 1 Cell 3</td>
         </tr>
         <tr>
            <td>Row 2 Cell 2</td>
            <td>Row 2 Cell 3</td>
         </tr>
         <tr>
            <td colspan = "3">Row 3 Cell 1</td>
         </tr>
      </table>
   </body>
</html>
This will produce the following result −

Tables Backgrounds

You can set table background using one of the following two ways −

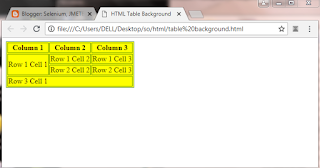
bgcolor attribute − You can set background color for whole table or just for one cell.

background attribute − You can set background image for whole table or just for one cell.

You can also set border color also using bordercolor attribute.

Note − The bgcolor, background, and bordercolor attributes deprecated in HTML5. Do not use these attributes.

Example

 <!DOCTYPE html>
<html>

   <head>
      <title>HTML Table Background</title>
   </head>
   <body>
      <table border = "1" bordercolor = "green" bgcolor = "yellow">
         <tr>
            <th>Column 1</th>
            <th>Column 2</th>
            <th>Column 3</th>
         </tr>
         <tr>
            <td rowspan = "2">Row 1 Cell 1</td>
            <td>Row 1 Cell 2</td>
            <td>Row 1 Cell 3</td>
         </tr>
         <tr>
            <td>Row 2 Cell 2</td>
            <td>Row 2 Cell 3</td>
         </tr>
         <tr>
            <td colspan = "3">Row 3 Cell 1</td>
         </tr>
      </table>
   </body>
</html>
This will produce the following result −


Here is an example of using background attribute. Here we will use an image available in /images directory.

<!DOCTYPE html>
<html>

   <head>
      <title>HTML Table Background</title>
   </head>
   <body>
      <table border = "1" bordercolor = "green" background = "/images/test.png">
         <tr>
            <th>Column 1</th>
            <th>Column 2</th>
            <th>Column 3</th>
         </tr>
         <tr>
            <td rowspan = "2">Row 1 Cell 1</td>
            <td>Row 1 Cell 2</td><td>Row 1 Cell 3</td>
         </tr>
         <tr>
            <td>Row 2 Cell 2</td>
            <td>Row 2 Cell 3</td>
         </tr>
         <tr>
            <td colspan = "3">Row 3 Cell 1</td>
         </tr>
      </table>
   </body>
</html>
This will produce the following result. Here background image did not apply to table's header.


Table Height and Width

You can set a table width and height using width and height attributes. You can specify table width or height in terms of pixels or in terms of percentage of available screen area.


Example

<!DOCTYPE html>
<html>

   <head>
      <title>HTML Table Width/Height</title>
   </head>
   <body>
      <table border = "1" width = "400" height = "150">
         <tr>
            <td>Row 1, Column 1</td>
            <td>Row 1, Column 2</td>
         </tr>
         
         <tr>
            <td>Row 2, Column 1</td>
            <td>Row 2, Column 2</td>
         </tr>
      </table>
   </body>
</html>
This will produce the following result −


Table Caption

The caption tag will serve as a title or explanation for the table and it shows up at the top of the table. This tag is deprecated in newer version of HTML/XHTML.

Example

 <!DOCTYPE html>
<html>

   <head>
      <title>HTML Table Caption</title>
   </head>
   <body>
      <table border = "1" width = "100%">
         <caption>This is the caption</caption>
         
         <tr>
            <td>row 1, column 1</td><td>row 1, columnn 2</td>
         </tr>
         
         <tr>
            <td>row 2, column 1</td><td>row 2, columnn 2</td>
         </tr>
      </table>
   </body>
</html>
This will produce the following result −


Table Header, Body, and Footer

Tables can be divided into three portions − a header, a body, and a foot
The head and foot are rather similar to headers and footers in a word-processed document that remain the same for every page, while the body is the main content holder of the table.

The three elements for separating the head, body, and foot of a table are −


<thead> − to create a separate table header.

<tbody> − to indicate the main body of the table.

<tfoot> − to create a separate table footer.

A table may contain several <tbody> elements to indicate different pages or groups of data. But it is notable that <thead> and <tfoot> tags should appear before <tbody>

Example

<!DOCTYPE html>
<html>

   <head>
      <title>HTML Table</title>
   </head>
   <body>
      <table border = "1" width = "100%">
         <thead>
            <tr>
               <td colspan = "4">This is the head of the table</td>
            </tr>
         </thead>
         
         <tfoot>
            <tr>
               <td colspan = "4">This is the foot of the table</td>
            </tr>
         </tfoot>
         
         <tbody>
            <tr>
               <td>Cell 1</td>
               <td>Cell 2</td>
               <td>Cell 3</td>
               <td>Cell 4</td>
            </tr>
         </tbody>
         
      </table>
   </body>
</html>
This will produce the following result −

Wednesday, August 8, 2018

HTML - Meta Tags


HTML lets you specify metadata - additional important information about a document in a variety of ways. The META elements can be used to include name/value pairs describing properties of the HTML document, such as author, expiry date, a list of keywords, document author etc.

The <meta> tag is used to provide such additional information. This tag is an empty element and so does not have a closing tag but it carries information within its attributes.

You can include one or more meta tags in your document based on what information you want to keep in your document but in general, meta tags do not impact physical appearance of the document so from appearance point of view, it does not matter if you include them or not.

Adding Meta Tags to Your Documents

You can add metadata to your web pages by placing <meta> tags inside the header of the document which is represented by <head> and </head> tags. 

A meta tag can have following attributes in addition to core attributes −

Attribute & Description

  • Name = Name for the property. Can be anything. Examples include, keywords, description, author, revised, generator etc.

  • content = Specifies the property's value.

  • scheme =Specifies a scheme to interpret the property's value (as declared in the content attribute).

  • http-equiv = Used for http response message headers. For example, http-equiv can be used to refresh the page or to set a cookie. Values include content-type, expires, refresh and set-cookie.


Specifying Keywords

You can use <meta> tag to specify important keywords related to the document and later these keywords are used by the search engines while indexing your webpage for searching purpose.

Example

Following is an example, where we are adding HTML, Meta Tags, Metadata as important keywords about the document.

<!DOCTYPE html>
<html>
   
   <head>
      <title>Meta Tags Example</title>
      <meta name = "keywords" content = "HTML, Meta Tags, Metadata" />
   </head>
   
   <body>
      <p>Hello HTML5!</p>
   </body>
   
</html>
This will produce the following result −


Document Description

You can use <meta> tag to give a short description about the document. This again can be used by various search engines while indexing your webpage for searching purpose.

Example

 <!DOCTYPE html>
<html>

   <head>
      <title>Meta Tags Example</title>
      <meta name = "keywords" content = "HTML, Meta Tags, Metadata" />
      <meta name = "description" content = "Learning about Meta Tags." />
   </head>
   <body>
      <p>Hello HTML5!</p>
   </body>
   
</html>

Document Revision Date
You can use <meta> tag to give information about when last time the document was updated. This information can be used by various web browsers while refreshing your webpage.

Example

<!DOCTYPE html>
<html>

   <head>
      <title>Meta Tags Example</title>
      <meta name = "keywords" content = "HTML, Meta Tags, Metadata" />
      <meta name = "description" content = "Learning about Meta Tags." />
      <meta name = "revised" content = "Tutorialspoint, 3/7/2014" />
   </head>
   <body>
      <p>Hello HTML5!</p>
   </body>
</html>

Document Refreshing

A <meta> tag can be used to specify a duration after which your web page will keep refreshing automatically.

Example

If you want your page keep refreshing after every 5 seconds then use the following syntax.

 <!DOCTYPE html>
<html>

   <head>
      <title>Meta Tags Example</title>
      <meta name = "keywords" content = "HTML, Meta Tags, Metadata" />
      <meta name = "description" content = "Learning about Meta Tags." />
      <meta name = "revised" content = "Tutorialspoint, 3/7/2014" />
      <meta http-equiv = "refresh" content = "5" />
   </head>
   <body>
      <p>Hello HTML5!</p>
   </body>
</html>
This will produce the following result −

Page Redirection

You can use <meta> tag to redirect your page to any other webpage. You can also specify a duration if you want to redirect the page after a certain number of seconds.

Example

Following is an example of redirecting current page to another page after 5 seconds. If you want to redirect page immediately then do not specify content attribute.

 <!DOCTYPE html>
<html>

   <head>
      <title>Meta Tags Example</title>
      <meta name = "keywords" content = "HTML, Meta Tags, Metadata" />
      <meta name = "description" content = "Learning about Meta Tags." />
      <meta name = "revised" content = "Tutorialspoint, 3/7/2014" />
      <meta http-equiv = "refresh" content = "5; url = http://www.tutorialspoint.com" />
   </head>
   <body>
      <p>Hello HTML5!</p>
   </body>
</html>

Setting Cookies

Cookies are data, stored in small text files on your computer and it is exchanged between web browser and web server to keep track of various information based on your web application need.

You can use <meta> tag to store cookies on client side and later this information can be used by the Web Server to track a site visitor.

Example

Following is an example of redirecting current page to another page after 5 seconds. If you want to redirect page immediately then do not specify content attribute.

 <!DOCTYPE html>
<html>

   <head>
      <title>Meta Tags Example</title>
      <meta name = "keywords" content = "HTML, Meta Tags, Metadata" />
      <meta name = "description" content = "Learning about Meta Tags." />
      <meta name = "revised" content = "Tutorialspoint, 3/7/2014" />
      <meta http-equiv = "cookie" content = "userid = xyz;
         expires = Wednesday, 08-Aug-15 23:59:59 GMT;" />
         
   </head>
   <body>
      <p>Hello HTML5!</p>
   </body>
</html>

If you do not include the expiration date and time, the cookie is considered a session cookie and will be deleted when the user exits the browser.

Note − You can check PHP and Cookies tutorial for a complete detail on Cookies.

Setting Author Name

You can set an author name in a web page using meta tag. See an example below −

Example

 <!DOCTYPE html>
<html>

   <head>
      <title>Meta Tags Example</title>
      <meta name = "keywords" content = "HTML, Meta Tags, Metadata" />
      <meta name = "description" content = "Learning about Meta Tags." />
      <meta name = "author" content = "Mahnaz Mohtashim" />
   </head>
   <body>
      <p>Hello HTML5!</p>
   </body>
</html>

Specify Character Set

You can use <meta> tag to specify character set used within the webpage.

Example

By default, Web servers and Web browsers use ISO-8859-1 (Latin1) encoding to process Web pages. Following is an example to set UTF-8 encoding −

<!DOCTYPE html>
<html>

   <head>
      <title>Meta Tags Example</title>
      <meta name = "keywords" content = "HTML, Meta Tags, Metadata" />
      <meta name = "description" content = "Learning about Meta Tags." />
      <meta name = "author" content = "Mahnaz Mohtashim" />
      <meta http-equiv = "Content-Type" content = "text/html; charset = UTF-8" />
   </head>
   <body>
      <p>Hello HTML5!</p>
   </body>
</html>

To serve the static page with traditional Chinese characters, the webpage must contain a <meta> tag to set Big5 encoding −

 <!DOCTYPE html>
<html>

   <head>
      <title>Meta Tags Example</title>
      <meta name = "keywords" content = "HTML, Meta Tags, Metadata" />
      <meta name = "description" content = "Learning about Meta Tags." />
      <meta name = "author" content = "Mahnaz Mohtashim" />
      <meta http-equiv = "Content-Type" content = "text/html; charset = Big5" />
   </head>
   <body>
      <p>Hello HTML5!</p>
   </body>
</html>

Tuesday, August 7, 2018

HTML - Comments


Comment is a piece of code which is ignored by any web browser. It is a good practice to add comments into your HTML code, especially in complex documents, to indicate sections of a document, and any other notes to anyone looking at the code. Comments help you and others understand your code and increases code readability.
HTML comments are placed in between <!-- ... --> tags. So, any content placed with-in <!-- ... --> tags will be treated as comment and will be completely ignored by the browser.

Example

<!DOCTYPE html>
<html>
<head>  <!-- Document Header Starts -->
      <title>This is document title</title>
   </head> <!-- Document Header Ends -->
<body>
      <p>Document content goes here.....</p>
   </body>
</html>
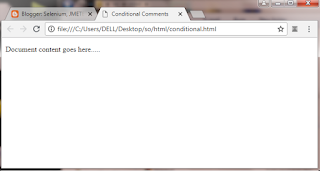
This will produce the following result without displaying the content given as a part of comments −

Valid vs Invalid Comments

Comments do not nest which means a comment cannot be put inside another comment. Second the double-dash sequence "--" may not appear inside a comment except as part of the closing --> tag. You must also make sure that there are no spaces in the start-of comment string.

Example

Here, the given comment is a valid comment and will be wiped off by the browser.
<!DOCTYPE html>
<html>
<head>
      <title>Valid Comment Example</title>
   </head>
 <body>
      <!--   This is valid comment -->
      <p>Document content goes here.....</p>
   </body>
</html>
This will produce the following result −

But, following line is not a valid comment and will be displayed by the browser. This is because there is a space between the left angle bracket and the exclamation mark.
<!DOCTYPE html>
<html>
 <head>  
      <title>Invalid Comment Example</title>
   </head>
<body>
      < !--   This is not a valid comment -->
      <p>Document content goes here.....</p>
   </body>
</html>
This will produce the following result −

Multiline Comments

So far we have seen single line comments, but HTML supports multi-line comments as well.
You can comment multiple lines by the special beginning tag <!-- and ending tag --> placed before the first line and end of the last line as shown in the given example below.

Example

<!DOCTYPE html>
<html>

   <head>  
      <title>Multiline Comments</title>
   </head> 
   <body>
      <!-- 
         This is a multiline comment and it can
         span through as many as lines you like.
      -->
      
      <p>Document content goes here.....</p>
   </body>
</html>
This will produce the following result −

Conditional Comments

Conditional comments only work in Internet Explorer (IE) on Windows but they are ignored by other browsers. They are supported from Explorer 5 onwards, and you can use them to give conditional instructions to different versions of IE.

Example

<!DOCTYPE html>
<html>

   <head>  
      <title>Conditional Comments</title>

      <!--[if IE 6]>
         Special instructions for IE 6 here
      <![endif]-->
   </head> 
   
   <body>
      <p>Document content goes here.....</p>
   </body>
</html>
You will come across a situation where you will need to apply a different style sheet based on different versions of Internet Explorer, in such situation conditional comments will be helpful.

Using Comment Tag

There are few browsers that support <comment> tag to comment a part of HTML code.
Note − The <comment> tag deprecated in HTML5. Do not use this element.

Example

 <!DOCTYPE html>
<html>

   <head>
      <title>Using Comment Tag</title>
   </head>
   <body>
      <p>This is <comment>not</comment> Internet Explorer.</p>
   </body>
</html>
If you are using IE, then it will produce following result −


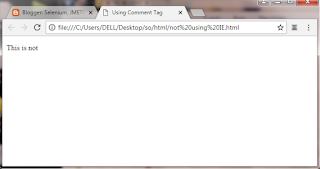
But if you are not using IE, then it will produce following result −


Commenting Script Code

Though you will learn JavaScript with HTML, in a separate tutorial, but here you must make a note that if you are using Java Script or VB Script in your HTML code then it is recommended to put that script code inside proper HTML comments so that old browsers can work properly.

Example

<!DOCTYPE html>
<html>

   <head>
      <title>Commenting Script Code</title>
      
      <script>
         <!-- 
            document.write("Hello World!")
         //-->
      </script>
   </head>
   <body>
      <p>Hello , World!</p>
   </body>
</html>
This will produce the following result −

Commenting Style Sheets

Though you will learn using style sheets with HTML in a separate tutorial, but here you must make a note that if you are using Cascading Style Sheet (CSS) in your HTML code then it is recommended to put that style sheet code inside proper HTML comments so that old browsers can work properly.

Example

<!DOCTYPE html>
<html>

   <head>
      <title>Commenting Style Sheets</title>
      
      <style>
         <!--
            .example {
               border:1px solid #4a7d49;
            }
         //-->
      </style>
   </head>
   <body>
      <div class = "example">Hello , World!</div>
   </body>
</html>
This will produce the following result −

Popular Posts