Sunday, August 13, 2017

What is RESTful web services


RESTful web services are built to work best on the Web. Representational State Transfer (REST) is an architectural style used for the same . In the REST architectural style, data and functionality are considered resources and are accessed using Uniform Resource Identifiers (URIs), typically links on the Web. it is a typically HTTP. In the REST architecture style, clients and servers exchange representations of resources by using a standardized interface and protocol


Below is the list of web service protocol


    1-BEEP - Blocks Extensible Exchange Protocol
    2-E-Business XML
    3-Hessian
    4-JSON-RPC
    5-JSON-WSP
    6-REST-compliant Web services
    7-SOAP - outgrowth of XML-RPC, originally an acronym for Simple Object Access Protocol
    8-Universal Description, Discovery, and Integration (UDDI)
    9-Web Processing Service (WPS)
    10-WSCL - Web Services Conversation Language
    11-WSFL - Web Services Flow Language (superseded by BPEL)
    12-XINS Standard Calling Convention - HTTP parameters in (GET/POST/HEAD), POX out
    13-XLANG - XLANG-Specification (superseded by BPEL)
    14-XML-RPC - XML Remote Procedure Call
There are a number of web services that use markup languages. For testing purpose and for our this


 "Api Testing step by step tutorial" 

 We are going to use only REST. 
1.1.JSON-RPC
2.JSON-WSP
3.Web template
4.Web Services Description Language (WSDL) from the W3C
5.XML Interface for Network Services (XINS) provides a POX-style Web service specification format
6.Web Services Conversation Language (WSCL)
7.Web Services Flow Language (WSFL) (superseded by BPEL)
8.WS-MetadataExchange
9.Representational state transfer (REST) versus remote procedure call (RPC)

API-Web Service  testing step by step


In the field of information technology technologies are daily changing. It's needed to keep yourself updated with latest one. So I am sharing my knowledge of API testing. Basically we need to start from scratch understanding you are beginner in web service testing.

We will cover all required points step by step. Let's start


      1. 1.What is Web services 

        2.Web service that uses markup language  

        3.List of Web service Protocols

        4.What is RESTful Web Service 


What is Web Service-API?

Web service is standard way to create communication between client and server application over internet. It is way of communication between two stand alone application to share information among them irrespective of their architecture and framework


In above  diagram there is Client and Web service . Web services sends request to client to get required information and client sends appropriate response to web service with requested information.


Another example to understand in simple web service . Suppose you have a website where you wish to show weather report in your website but instead of developing everything you can use a data from existing website where weather forecast is already developed. Now you can use that weather data using API in your website.

I would like to tell another simple real time example for webservice here. Suppose you went to Hotel and there is kitchen now here there is a mediator who takes your order and pass it to kitchen to prepare food and once food is prepared mediator takes your ordered food from kitchen to you. In this scene Mediator plays role of API - Webservice.


Wednesday, November 9, 2016

 Here we are going to learn how to record  selenium script using Selenium IDE

Use below steps to learn recording selenium script using IDE


  1. Open Firefox Browser
  2. Go to tools Click on "Selenium IDE"
  3. Click on Red button 
4.  On click red button record record will start
5. Open Firefox browser
6. Type URL www.google.com
7. Search "Happiness"
8. Click on any link in search result
9. In Selenium IDE click on Red button to stop selenium recording
10. Selenium record script (Below image)
11. Save Script

Using this way you can record first selenium script using Selenium IDE. 


Sunday, November 6, 2016


Before starting practicing selenium IDE you need to install Firefox and selenium on Firefox

below are the steps to download and install selenium IDE


  1. Open Firefox browser
  2. Open URL seleniumhq.org
  3. In the menu tabs click on download 
  4. Press "Install now "button 
  5. Selenium IDE add on is installed 
  6. Click on "Restart Firefox" button 
  7. Go to tools and verify whether verify whether "Selenium IDE" is displayed 
  8. If Found then the selenium IDE installation is completed 


Next we need to know about Selenium IDE .

Firefox extension allows recording and editing of test in IDE. It make test development easy.


  • Record and Playback
  • Intelligent field selection will use IDs
  • Auto complete for all common selenium commands
  • Walk through test cases and test suites
  • Debug and set breakpoints
  • Save tests as HTML , Java, PHP and other such formats
  • Support  for selenium user extension  .js file
  • Option to automatically assert the title of every page 


Before starting with selenium it is required to know "What is Selenium"?

in simple words we can say "Selenium is portable software testing framework for web application"

The test scripting in selenium can be write in HTML tables as well as multiple popular languages and can run in most of the latest web browsers

We can use selenium on different different platforms like linux, windows, Macintosh.

Components of Selenium

  • IDE 
  • RC
  • GRID

Next Lesson  Features of IDE

Saturday, May 28, 2016

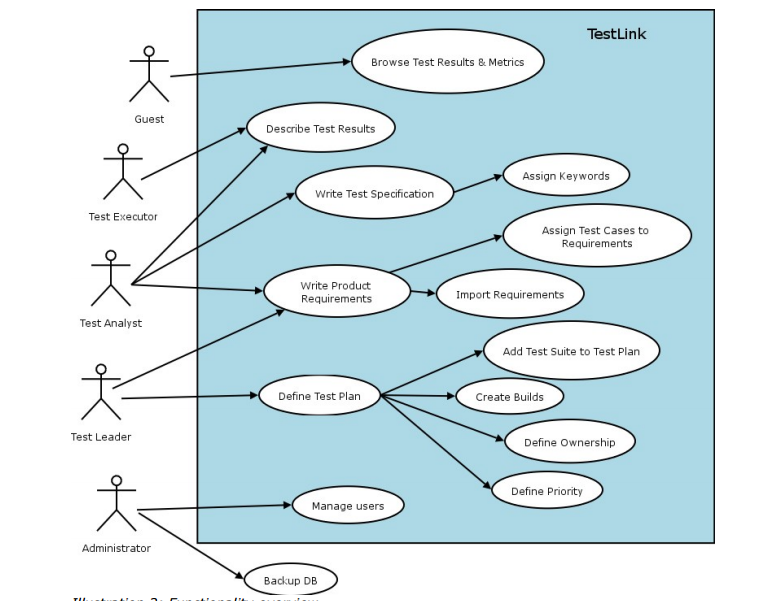
Here we are going to learn about "Testlink Work Flow".   It is step by step approach in test management


Administrator :- Who is responsible to create test project
Test Leader:-  Who create or Import Software Requirement
Test Analyst :- Who describes test scenarios in respect to test specification
Test Executer:-  Who is responsible for creating , executing  test cases and publish test results
Guest:-  who use these test result and metrix. ( Customer/client)
After creating project we need to create user roles. We can create user roles in Testlink and Assign them to users who are going to be part of whole SDLC cycle .  We can create different roles and assign different permission to access Testlink . Like , Business admin , Developer, tester , manager, customer. Etc. so  user with respected role will be able to access only those thing for which role is created.  Now we will look in detail "How to create user roles in Testlink "

Click on user role menu form Testlink menu . It will redirect you to "User Management" page in Testlink 
By default you will see only one user as Admin. We will see in next session about "How to create user in Testlink". Click on "View Roles" . It will display you existing user roles 

Click on Create button 


Enter role name and assign access for role. Enter role description and click on save button . It will create new role. We can use this role to assign any specific user. If you don't want to create new customer then you can use existing roles also or you can modify existing roles . 


General information  about Testlink :-
TestLink is a web-based test management tool that facilitates software quality assurance. It is developed and maintained by Teamtest. You can prepare test cases, test suites, test plans, test projects and user management, as well as various reports and statistics. In our earlier topic we learned about how to Install Testlink on windows 7 

Index 

  1. Testlink Workflow in Detail 
  2. Creating Project in Testlink
  3. Create user role in Testlink 
Here we are going to learn about how to create new project in Testlink.  When you install Testlink on your machine first time and do login to Testlink. It will show you a default screen to create project. Its always needed in process to create a project.


Have closer look on above picture . It clearly asks to add required data in fields to create new project. There are many fields for which we need to enter data. One by one we will learn how to create a test project in Test link 

First we need to add Project Name . Its mandatory field . 


Here we entered project name for our project as " Test Project"
Now moving next we need to add prefix to test case id in test link . Now many of new tester may have question "What is Prefix for test case ID in Testlink ?"  Prefix means the word or character appended as prefix in test case id 
for example 

T-001
Here T is prefix given by me while creating project and 001 is auto generated test case id. So you just need to enter prefix. This is also mandatory field.


Next field for which we need to enter required data is Project Description. Here we have to use simply project description about project. You can yous formatting tools also . 


About enhanced features in Testlink 
You can select if those are required for your project. Its non mandatory. Checking it will provide you some additional  features like, Requirement mapping feature, Priority feature , Automation . 
You can make project availability Active by selecting check box next to Active. If you just want to create a project and dont want to use it immediately you can create it without selecting Active check box 

you can make it Public by selecting check-box . 


Now click on Create button to Create project in Testlink . And you can see your Project is created in Testlink under Test Management 


Popular Posts